Newsletter Comments from SCScompA

Newsletter Date: November 30, 2001

Welcome to my monthly newsletters. Well.... Again, I delayed the newsletter to mid-month -- and, in some cases: Later. It seems as if there is not enough time in the month to keep up! I apologize!!! In any case, browse the following and feedback any comments. Thank you, in advance.

If you have not seen the October 21st newsletter please take a look at it in its final format when you have a chance.

I encourage you to browse earlier SCScompA newsletters if you have not already done so, and to send me any comments/questions/concerns that you may have regarding material presented in these newsletters.

A lot of holidays are coming up as the year 2001 comes to a close. I wish you all a good end-of-year and a wonderful/peaceful 2002.

Let's begin, as usual, the newsletter with a couple of scanned (I use a Microtek ScanMaker V6upl) comics.

-------------------------------------------------------------------
Doing what is Correct

Sometimes, whatever we do seems to be wrong! Even if we do what we should....

-------------------------------------------------------------------
Entrance Exams

I am sure Hagar actually was welcomed... after he completed the entrance exam!

-------------------------------------------------------------------

I hope you have a good month of using -- and, I wish you have continued success with -- your home computing systems.

Contact me regarding any matter in this newsletter that causes you concern or you want to otherwise discuss.

Regards,
Dave Shogren
eMail to: SCScompA@aol.com

---------------

What do I Use My Scanner For?

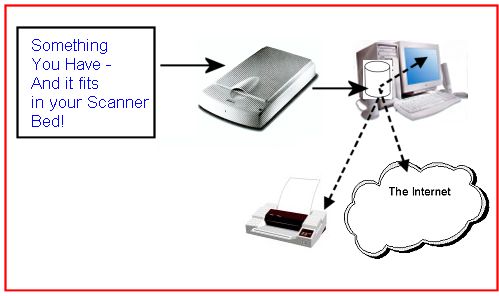
I was asked a number of times this month what I use my scanner for. Although I have discussed this matter in past newsletters and I normally show examples of using my scanner in each newsletter -- I will use this newsletter item to update you on what I use my scanner for on a regular basis.

Perhaps the following will assist you in making a decision if you purchase a scanner if you are not already making use of a scanner in your home computing.

I start this short discussion by the following figure:

Basically, I use the scanner for anything that fits in my scanner bed -- and, that I want to:

  • Save on my PC's Hard Disk

    or

  • Print

    or

  • Display on my PC's display

    or

  • Share with others by placing the scanned image/information on the Internet.

Some examples of each of these include:

  • Save on my PC's Hard Disk

    Why? Well.... I back up my PC's hard disk a lot. The PC's hard disk can, therefore, be a "safe" and easy-to-access place for information I have scanned. Including:

    • Documents related to family or school information. For example, newsletters that have been mailed to me in hardcopy form from family/friends/business associates. Or, perhaps homework/school reports that I want to save.

      The documents I save are normally "images" of the hardcopy. Similar to a photo of the hardcopy. It is possible using software such as Omnipage Pro to scan the document into text format. I sometimes do that.

      Why? Sometime in the future I may -- or, my family may -- want to easily review/look at information I have saved on my hard disk. Scanning the information saves that information for years/generations.

      Assuming I back up the hard disk information! I hope I need not keep repeating that you must backup onto external media anything you expect to save.

      Consider something you are working on now (such as a school report) and sometime in ten, 20, or however many years from now you or someone else might want to look at that information. Perhaps it will give them a smile!

    • Photos. The same type of discussion goes as above. Save copies of your photos and provide an easy place for someone days/weeks/months/years from now to review. Do it!

  • Print

    Print what?

    • Anything you have scanned/saved! Yes, you may have a hardcopy of that already. However, while the scanned item is "inside" your computer you may use that scanned/saved image within another report/image or enhanced the scanned item's image to improve its value to whomever is reading it / reviewing it.

      Days/weeks/months/years from now.....

  • Display on my PC's display

    • Again: Anything you have scanned/saved!

      For example, photos you have scanned from family/friend's get togethers or vacations. As mentioned earlier in this discussion, you may have improved/modified/joined-together photos and other information to improve the value of what you originally scanned.

      Days/weeks/months/years from now.....

  • Share with others by placing the scanned image/information on the Internet.

    • Again: Anything you have scanned/saved!

      I know this is simply repetition of what we have said above. However, take the chance to use you scanner and share the scanned information with family/friends by taking advantage of the Internet and associated products.

      Remember, as we have shown and discussed in other newsletters: You may choose to build a displayable set of information in "Internet" format (HTML) and display that information locally on your PC or send a ZIP disk or a CD to someone including the information and they can view the information without using the Internet.

      HTML is not difficult. Use it!

In any case, the above discussion is aimed at giving you some ideas, if you are uncertain why I always recommend a scanner to anyone I configure a home PC for.

For $150 USA you can get a very nice scanner and an adequate scanner that might well serve your purposes can be purchased for less ($75 -to $125 USA is commonly available).

Don't hesitate to contact scscompa@aol.com with any comments on the above or for any related discussion.

This Month's Example of Viewing Scanned and/or Digital Camera Pictures using HTM (Web page) parameters.

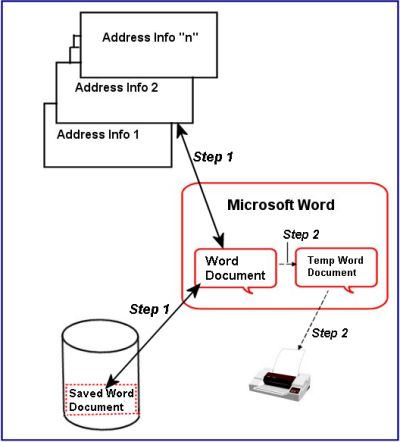
In most of my newsletters, I show a few examples of using an HTM-type approach at sharing photographs or other material including scanned images with family/friends.

This month I discuss/show examples of:

  • Digital camera examples. Including use of Olympus Camera: "Normal" mode and "Macro" mode.
  • Example of using PaintShop Pro's Screen Capture support.
  • This month's Great Golf Hole.

To see this month's example click on: This Month's Photograph Examples from SCScompA.

-----------------------------------------------------------------

Don't hesitate to contact scscompa@aol.com with any comments on the above or for any related discussion.

Miscellaneous Comments Regarding Home Computer Use Matters that Came Up in September/October

  • Miscellaneous Matters.

    • Example of Using Microsoft Word to Print Address Labels

    Sometimes, when we have a "mailing" to multiple addresses, it is convenient to print out an address list.

    The address list can be printed on actual mailing labels. The mailing labels may be standard/normal/of-known-manufacturers -- or, you could design your own label.

    This example is aimed at discussing how I use Microsoft Word in such a situation. Those of you familiar with the topic might wish to skip this section of the newsletter.

    Those of you who use another application than Microsoft Word for this type of matter, let me know what you use. I am sure there are some very nice/convenient-to-use address list "management"/use applications! I, just, happen to use Microsoft Word.

    Following, is an overview of what we are showing in this example:

    Hereafter, in this newsletter, we will refer to Microsoft Word as (simply) Word.

    As shown above, the procedures to use Word to print address lists include two primary steps. Later-on in this newsletter you may choose to click on a link that shows the panels involved in these steps. For now, a description of the steps are:

    1. After gathering the information for the address list, we enter that information into an as-usual Word document and save that Word document onto our hard disk.

      We may read/modify and enter/re-enter address list information a number of times during this step. We are, in this step, simply preparing the information for later-on printing on the address list labels.

      Naturally I "back up" (save) the Word document on external media as part of my regular backup procedures. I hope, to those of you who regularly read these newsletters, I don't have to expand on this comment -- and, for others of you reading this newsletter: Always back up your information that is on the hard disk! I back up key Word documents and other files I work on a particular day -- at the end of each day I work on them. I use a ZIP drive disk. Sometimes I use a floppy disk. You do your backups regularly. How regular? That is your decision. Anyway --

      Eventually we have the address list information into Word.

      Note: We place the information into a Word "table" format. Each of the cells (fields) in the table rows contains part of the entire address. For example, the first cell in a table's row could be the first names of the address (Example: John and Martha), the second cell the last name of the address (Swanson), the third cell the beginning of the address (46 Rolling Hills Road), and so on. I will show an example of this later in this newsletter.

      During this step, we could print this Word file for "hardcopy" reasons or for purposes that another family member may have for a printed list of whom you are mailing information to at this time. For example, you may be using a mailing list for an upcoming family/friends get-together and someone in the family may want a list of whom you mailed information to.

    2. Since we have the address list in the PC in Word format, we can ask Word to print the address list on labels of our choice.

      Word is told to read the address list Word document that has the address list information in table format and print that onto a particular label that we place into our printer. We may have purchased the label at a local office supply company -- or, we could have designed/made the label ourselves.

      Word reads the address list information and places it into a temporary ("New") Word document. For this example, the temporary new document is not used after the labels are printed.

    Let's go through an example: (Note: As with all of our examples, "click on" or "double-click" on implies left-button click.)

    For Step 1 (Building the Address List into Word in table format. To see example panels of the following, click on the link referenced after the following list:

    • First we have to gather the information to be placed into the address list! This "gathering of information" is done from your personal address book, telephone books, etc. There is no "magic" to gathering the information. However, you obviously need the information to give it to Word!

    • Now that you have the address book information, place it into a Word document in table format.

      For example:

      • Open Microsoft Word and click on: File->New assuming the address book document does not exist yet. If you already have a "new" blank file in your Word document: OK! Just continue as indicated, below.

      • Place the address list information into a table in your Word document. Click on: Table->Insert->Table

        Choose some number of columns (fields) that you expect in your to-be-written address. I normally use eight for "Number of columns". Choose any number of rows as the number of expected addresses in your list. Both of these specifications can be adjusted later if needed, within the Word document itself.

        For the "Autofit behavior" I use the AutoFit to contents option.

      • I start out the table data by filling in the cells (fields) in the first row of the table with identification of what the address field is. For example, in cell one I enter the words: "First Names", into cell two I enter the words "Last Names", etc.

        I use eight fields in my address lists:
        First Names
        Last Names
        Address Field 1
        Address Field 2
        City
        State
        Zip Code
        Country

        I do not have to use all fields in each address.

      • Now, just enter all the addresses into the table. One address per row.

      • Save the address list Word document and make note of its name so you can find it again!

        Back it up on external media sometime!

      • Optionally: Print the information as you now have it, on plain paper, for use as a hard-copy of your address list.

      That is all there is to Step 1 of using Word to print address lists. Next, we will print the address list on labels of our choice.

      If you wish to see panels representing the above Step 1: Click on: Panels for Step 1 in Using Word To Print an Address List

      Let's now take a look at Step 2. Repeating the overall picture of what we are aiming at with this example:

      In this example, we want to have Microsoft Word print the address list on labels.

      Naturally, if "all" we wanted to do was print the address list we just created in the table (see Step 1, above) we could do that by just printing that Word document.

      And -- I recommend you do that! Just open that document and print it. That way you have a list of what you have entered into the table/document. You could use that as a "check list" for confirmation when you hear from individuals you mailed something to -- or, for any other reason.

      However, in this example we are going to use Microsoft Word to print our labels on "label paper" -- not, just plain paper.

      First, I decide what kind of labels I want to use. In this example, I will use Avery ink Jet Labels "8160" size 1 inch x 2 5/8 inches.

      For me to print to that size label on a sheet of paper: I ask Word to do that for me!

      Word does the work in a "temporary" new document, merging the information from your existing document/table. The above figure tries to show you that with the two arrows of Step 2.

      OK! Let's try to print the labels on the "label paper".


      • Start with a New Word document.
      • Once that document is opened, click on Tools->Mail Merge
      • Click on Create->Mailing Labels..
      • Create the mailing labels (for this example) in the Active Window
      • Use the data from the previous document created in Step 1 (above). Click on Get Data->Open Data Source... and find the Word document in your Windows folder! Remember the name/place? You saved it in Step 1 (above). There, we entered the data in table format.
      • Click on Set Up Main Document and select the label type. In this example, we want to use Avery standard labels 8160. After finding those in the list from Word, click on OK.
      • Click on Insert Merge Field, where you will be asked about the fields you want in your to-be-printed label. We want to use First Name, Last Name, and so on. We enter the fields as we want them to appear on the label. Enter a "blank" (press the space bar) or the Enter key for a new line. You will be repeating this step (Insert Merge Field and selecting your field for the address line) until you have completed the label description. In this example, we place the First and Last names on the same line separated by a blank, Address 1 on a new line, Address 2 on a new line, City, State, Zip on the same line separated by a blank, and lastly (for this example) Country on a new line. Click on OK when you have finished the label's description.
      • Click on Merge. Data will be merged from the previously-build Word document/table into the new (temporary) Word document.
      • Click on New Document for this example. You optionally could choose to go directly to the printer. For now, let's go to New Document.
      • Click on Merge. The new document will be shown to you and you could at this time save the file -- but, we already have the data in our earlier work as part of Step 1.
      • Make sure your chosen print label form (Avery 8160 in this case) is in the printer. Click on File->Print to print the information onto the label form.

        OK! You have successfully printed your labels. Check them for alignment on the paper and use them in your mailing.

      If you wish to see panels representing the above Step 2: Click on: Panels for Step 2 in Using Word To Print an Address List

      Optionally, consider modifying the printed label by "designing" your own label, for example include your Return Address on the print data passed to Word.

      If you are interested in more information related to this topic let me know and I will expand on this item in an upcoming newsletter.

      Lastly, on this topic: The Word "Help" is quite useful for matters such as we just discussed. I encourage you to give Word's "Help" a try if you are not used to doing that. The same is true about any reputable application: Try Help and see if you find what you are looking for.

      Good luck with your use of Word!

    • Some Web pages used this past month:

      As a reminder, to those of you who are new to my newsletters, I use the following regularly (I am intentionally not making the following information clickable. Just enter the addresses into your Web browser's "go to" field if you wish to go there now. Perhaps use copy/paste from this Web page's following information. In any case, for information, my most-used Web pages this month include:

      • Search engine of my choice: Primarily, Google: http://www.google.com
      • USA Newspaper (Minneapolis Star Tribune): http://www.startribune.com/
      • Europe Newspaper in English (Edinburgh Scotland, Scotsman): http://www.thescotsman.co.uk/
      • Europe Newspaper in German (Zurich Switzerland): http://www.tages-anzeiger.ch/portal/tagi/portal.htm
      • America Online's support for: "Business News", My Portfolios", "Movies" (Reviews), "Top News".
      • Weather: http://www.intellicast.com/

        There are, naturally, other Web pages I used as the month went by -- but, the above I use on a daily basis.

        Let me know what Web pages you use on a daily basis.

    • Maintenance Matters.

      • Nothing "dramatic" came up this month maintenance-wise on my systems. As a reminder, however:

        Backup any of your user files / folders that contain information that you do not want to recreate. Remember: Your PC will break... You will have to, eventually, (probably at the worst possible moment!) recreate your user-data from your backup media.

        • I use a ZIP disk as my backup media.
        • I backup daily any file I work on (such as a Word presentation) more than 1 hour.
        • I backup monthly all my user files/folders.
        • I backup monthly all other family member's user files/folders that are on my PC.

          I remind other family members who use our family PC that if they want more-than-one-month backups of something they are working on, they need to ask me to back up specific files/folders.

      • The latest McAfee XDAT (file for use by McAfee in identifying viruses) I have downloaded and installed is: 4172xdat.exe

        I recommend that whatever virus protection service you use, you check at least once a month for virus updates.

      Have a good, maintenance-free time until we talk again.

    Contact SCScompA if you have any comments or questions about the above.

---------------

Freecell Game/Deal of the Month

We continue, in our household, doing Freecell deals from 1-to-32000! We will NOT accomplish this task. We know that. However, as we go along in our for-fun-effort, yet frustration... I will mention once in awhile specific Freecell deals we find challenging.

Note: If you are running your PC on Windows 98, it is possible you have to specifically install Freecell. Just install Accessories/Games.

Let me know if these Freecell games and the number of times we had to restart to solve the deal is about what you find. If you are going to attack deals 1-to-32000 and want to interact with us in that regard, let me know what thousand-or-so you are going to start with. We have completed deals through 2000. Now, we are attacking 2001-to-3000 and I would recommend you start with 3001! At the rate we are going (a little more than 100 deals a month) it will only take us 22 more years to complete the 32000 deals without your help. If you let us know what you have completed, it will take us less time!

I am adding to this column in the newsletter a few "special" games that we found during the month.

  • Deals we completed in one start and view as "easy"-but-still-fun games this month:
    Freecell Deal Numbers: 2034
  • Other deals we found interesting-and-not-too-hard this month (number of times to restart is in parentheses):
    Freecell Deal Numbers: 2036(3)
  • A different type of deal was:
    Freecell Deal Number: 2038.
    Number of times I had to re-start to complete in lost-count moves: 7 (Well, to be honest: I have not yet completed it -- it was successfully completed by other family members..).

  • Deal 598 continues to be the most difficult one we found in deals 1-2000.

  • Deal 1123 is the easiest deal, in our opinion, that we have found so far, with 2018 being second-easiest in our opinion. Another easy one is 2034.

Let me know how YOU do!

If you want to see our list of Freecell Deals 1-thru-what we are working on now and our comments on how many times we had to restart the deal to find a solution, let me know -- or click on: SCScompA Freecell Table of Completed Deals

---------------
To contact me about anything on this Web page, please: send mail to: SCScompA@aol.com

Or send snail-mail to:

SCScompA
P.O. Box 58223
Raleigh NC 27658
USA

------------------------------

Use your Web browser's Back button or to go to SCScompA's main Web page and other newsletters, click on: SCScompA main web page or go to any of the pages pointed to in the SCScompA frame at the left of this panel.