|
Recently, I had another situation where I worked with someone who had recently purchased a digital camera and, in turn, wanted to know how I use my digital camera -- and, what I recommended the person "attack" as a digital camera user.
I know that we have talked about this often in previous newsletters; however, I try to summarize the matter one more time this month.
- What digital camera to buy?
Primary factors in my opinion:
- Physical size of the camera. I prefer one that, when it is not in a protective case (or, perhaps even if it is in its case) the camera fits comfortably in my pants pocket. Note that I did not say "pocket". I want to use the camera inside/outside -- so, jacket pocket is not in my decision-making. Plus, having it in the jacket pocket is security-wise something I do not want to do.... leaving a jacket lying around with things in a pocket can end up tempting someone.
- Physical size of the camera buttons as relates to my hands/fingers. I need to be able to manipulate the buttons/camera options quickly/easily and without "moving" the camera as I point-and-shoot the camera.
Try! Prior to purchasing. If it is not reasonable/allowed to remove the camera outside the store-of-camera-purchase: At least, point/shoot the camera as possible while moving through some of the camera's options, including:
- Number of pixels for the image to be taken. Digital cameras will have terminology/settings such as "HQ" (high quality - a lot of pixels!) and "SQ" (standard quality - fewer pixels than when using higher qualities). The digital camera you choose may have different terminology, but the concept remains the same,
I choose to run the camera at a max of 2-meg pixels, since I use my taken-images mostly for PC/Web purposes. Even at 2-meg max, I know that I will resize/crop the pictures quite often. I may decide to (during a particular set-of-pictures I am taking) change the picture-quality/pixels as I go along. Default to 2-meg, change "down" sometimes to 1-meg (we talk about meg/pixels later in this news item) or change "up" to a greater-than 1-or-2-meg for particular photo opportunities.
This step (choosing the pixels for default and for particular pictures) should be tested-out prior to purchasing the camera so that the buyer knows it is easy/quick to accomplish -- and the buttons that need to be pressed "fit" the buyer's finger size!
- Move to Macro mode and, then, to "normal" mode after the macro image has been taken. Macro mode is for close-ups (down to, for example, 8-inches and up-to about 24-inches). I go in/out of macro mode a lot. Again: Button/ease-of-use should be checked.
- Zoom. Quickly. Easily. Without "shaking" the camera as you after-zoom and take the picture. Button-size as relates to your fingers.
- Timer. Again: Quickly/easily. Sometimes you want to be included in the taken-picture -- but the other people want it done quickly!
If the above factors are checked -- and you are comfortable that you can do them quickly/easily with your fingers: Terrific! Consider buying the camera!
- Number of pixels. Well, this topic is covered a lot by any camera documentation and Web page discussing digital cameras. For my use (mostly on the home computer and Web), 2-meg is a nice default (actually, I default most of the time to 1-meg). Why do I say to default to 2-meg while I (personally) default to 1-meg? I use 99% of the digital camera's output on my home computer/Web. Even at 1-meg default I often resize/crop/modify the image to be less size than the 1-meg default. However, for the few pictures that I print: The higher number of pixels (most of the time!) is an advantage. I, just, find 2-meg max fits my home computing / Web use.
Would I (Do I) ever use greater than 2-meg pixels? Yes! However, only for about 1-percent of the pictures I take. If I suspect that the primary use of the to-be-taken picture is printing: I recommend using the highest number of pixels your camera offers. 1-percent of the time.
The greater the number of pixels, the more resources that will be used/required by your home computing / Web use of the digital pictures when they are "in" the computing system. Yes, our home computer and high-speed Web use/needs/capabilities are changing the digital picture playing field. Our systems are getting faster, the software we use is getting more flexible and easier to use. However, for our normal use in home computing: I recommend defaulting to 2-meg pixels max (perhaps, even, 1-meg) and for the 1-percent of the time you may expect to print the image: Use the max your camera offers (such as 4-meg pixels).
- The pictures are "on"/"in" the camera. Now what?
You bought a camera. You read the camera's documentation about, for certain:
- Default pixel size -- and you have set that default.
- Macro mode -- and you know that if the picture you are taking is a close-up (within a couple of feet or as close as 8-inches) -- and you know how to go to - and revert out of - macro mode.
- Timer. How to set the timer and how to take a picture when the timer is being used.
You took some pictures! Both normal and macro. Some with zoom. Some using the timer.
- You had some software (CDs) that were "given to" you (of course, you paid for them as part of the camera purchase... nothing is free...) and you have at least browsed the software's documentation regarding installation and use of the particular software.
Install! Place the software's CD into your computer/laptop's CD-drive and, if you do not have someone who knows better to help you, take the software's offered installation defaults. Normally, doing what you are asked to do at installation time is fine. Naturally, if you have someone to help you: Great. Otherwise, in most cases, just taking defaults will end up with your software being installed -- and:
- You may be asked to connect your camera at this time to your computer/laptop.
OK! You have some pictures on the camera (assuming that you have taken some pictures!) and when you connect the camera to the computer after your software installation has asked you to do so: The software will read the camera and its images.
If you do not have any pictures on the camera -- or, for some reason you do not want to connect the camera to your PC/laptop at this time -- just Exit the software (if it is active) and, later on, connect your camera to the PC/laptop.
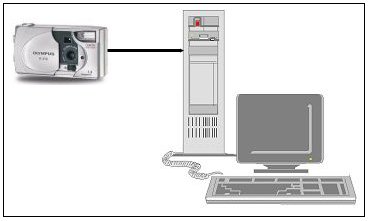
- Sometime, either immediately after the camera's software installation or at a later time, connect your camera to the PC. We talked a little about this in the December, 2003 newsletter.
For this discussion, let's assume that you have a cable that the camera package contained -- and that cable has an end that fits into the camera somewhere and, also, into your computer/laptop!
Connect them! One end of the cable goes into a camera "slot" and the other end goes into a PC/laptop slot. (We will not go into the type of cable-connection/slots in your PC/laptop. I assume that, eventually, you find a "match" between the hardware and the cable! If you cannot find such a match, you will have to find someone to assist you).
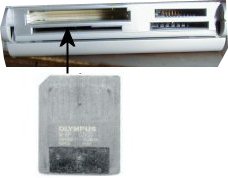
Note: We talked in the December 2003 newsletter about another approach to getting the pictures to the PC/laptop. This approach involves removing the digital camera's memory-card from the camera and, in turn, placing it into a PC/laptop slot that supports your particular camera's memory-card. Some PCs come directly with such a PC/laptop slot or you can purchase such a "slot" holder. Following, is an example of one type of digital camera memory-card after it has been removed from the camera being inserted into the PC/laptop slot. If you have such a slot on the front of your PC/laptop -- or if you have a "holder" that connects to the PC/laptop -- this approach is an alternative to connecting the digital camera to the PC/laptop. If you use this approach, you simply use the "slot" as you would any hard-drive device and the following "automatic" starting of your picture/image application will not occur.
- Once you connect the camera to the PC/laptop using the cable that came with your camera's purchase: Power on the camera!
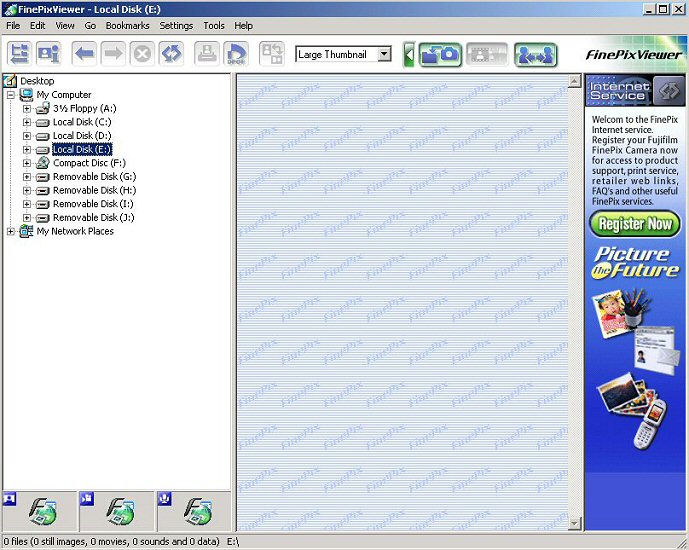
This, probably (hopefully...) will prompt the application that you installed (the application that came with your camera and you just installed as discussed above) to begin. You will be presented a panel that asks you some questions and may will also "automatically" read the pictures from the camera. The pictures may be shown in a small "thumbnail" manner on your PC/laptop display. The panel could look similar to the following:
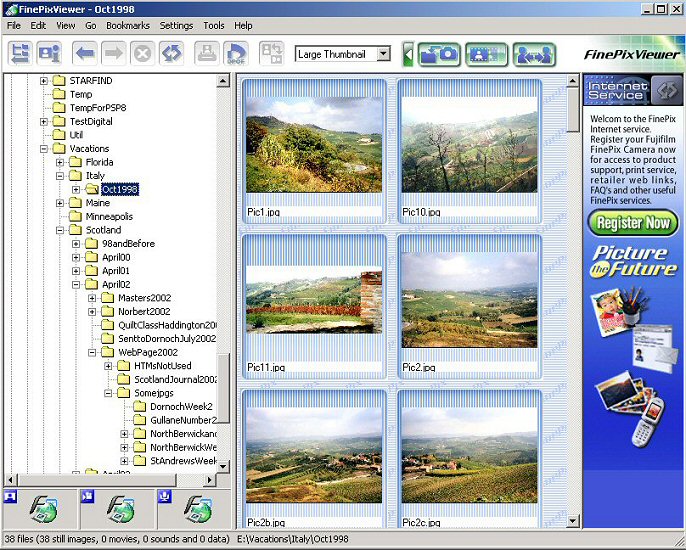
Although your application/panel may be different than the above -- the functions offered are probably similar.
In the above, the information/advertising at the right side of the panel is due to the fact that you were "given" the software as part of your camera's purchase. I normally ignore the offers -- but, sometimes it may be of value to register your new product in case you want upgrades and other matters provided by the software company. Also, in some cases, getting technical support is based on your registration. If I do register, I just am careful to not sign up for something I do not want and, also, make sure I do not provide any information other than eMail address.
The panel on the left side shows the current directory/folder/"device" that the application is working with. In the case that you had just powered on your camera, the folder shown probably/hopefully is your camera! If not, you may be able to use normal Window options to point the left side panel to your camera and, then, open the camera's pictures.
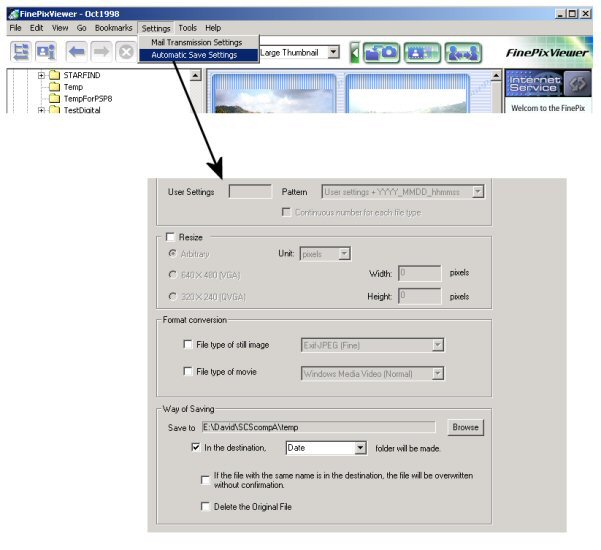
Sometime, before you process the photos or shortly after, you should take a look at the defaults currently in place. In this example, we click on Settings->Automatic Save Settings and, perhaps, modify the default setting to point to a folder that you use specifically for pictures that are downloaded from the camera. In this example, that is in the "Way of Saving" part of the panel.
I prefer to use a folder of my choice rather than one that the application defaults to after installation.
- What are some things -- other than look at the "Thumbnails" I might do with the software?
A number of matters may be addressed by whatever software comes with your digital camera. In addition, some of us (myself included) use some image processing application such as PaintShop Pro. Once you have the image into your home computing system (PC and/or Laptop) it is possible to use any image processing application. Simply point your image processing application to the data you have "downloaded" off of the camera -- that is now in some folder or directory on your system -- and process the image as necessary! We talk about and see examples of using PaintShop Pro often in my newsletters, so we will not go into that during this newsletter item.
Basically, three important and often-used matters that you will often do after the images are moved from the digital camera to the PC/laptop are:
- Print the image. I put this first in this list -- but, in fact, the printing often is the final step you do! Mentioning printing first, though, is intended to remind you to: Save the original image you get from the camera! If you later resize or otherwise modify the original image for PC/laptop use, it is very possible that you will want to print selected images. Having the original "detail" / large-in-pixels' image can give superior print quality as compare to printing the modified smaller-in-pixels' image that you use for PC/laptop displays. remember: Save the original in case you choose to print it.
Once in awhile, just take the time to purge/remove un-wanted originals from your hard-disk. Perhaps use external media such as a ZIP disk or CD/RW output as a final-save approach before removing the originals from the PC/laptop's hard disk.
- Resize the image. If you are going to use the image on the PC/laptop display, you often may as well resize the image to fit your display.
I use a guideline of 600-to-550 pixels high, keeping the scale of the original image intact. This normally fits any PC/laptop that I use.
Here is an example. The picture shown on the left is large.... as from the camera. I show it, here, quite small as a convenience for those of us on dial modems. If you want to see the image full size, click on the smaller-shown image on the left. The picture shown on the right has been resized from the original to have a height of 550 pixels while keeping the original picture's scale.
|

Note: Clicking on the above will show a picture 1600 pixels wide by 1200 pixels high (1600 x 1280). The size to be downloaded is 550 Kb and will take about 2-minutes on a typical 56Kb dial connection. When shown, the 1600 x 1280 size may well be outside the specifications of your computer display. That is why I use the 550 -to- 600 pixel high (keeping the scale width and height of the original image) for a normal-shown Web displayable image as shown to the right of this comment.
|

|
Although the camera you purchased recently has (probably...) higher pixel-rating than the above-right-shown image (550 pixels high), if you are going to show the image on a computer display, you may want to (probably do want to...) resize the image such as shown above right. Just remember to save the larger image. You may want it for printing or for some other purpose.
Also, resizing the image prior to sending the image to friend/family via eMail is common/necessary. What size should you make the image for sending through eMail? Well, I tend to use the above 600-to-550 pixels high guideline. If, however, you want just to share the general idea of a picture you have taken, then a smaller size is, of course, sufficient. One small size often used for such a purpose is 250 pixels high or about 2.5 inches.
|
100 Pixel Wide

|
200 Pixel Wide

|
400 Pixel Wide

|
Which size should you send when using the network? I prefer to send a larger size... The one on the above, right, is not too bad for my taste. However, the one, below, is the one I normally would send.
|
700 Pixels Wide, 525 Pixels High

|
Let me know what size you end up using the most when sending a picture using eMail.
- Brightening / "Auto Contrast" the image. Sometimes our digital camera image ends up benefiting from some "brightness". This may be done with either some image processing application such as PaintShop Pro or by using the application that comes with your digital camera. I use PaintShop Pro.
|
As From Camera

|
After Brightening

|
|
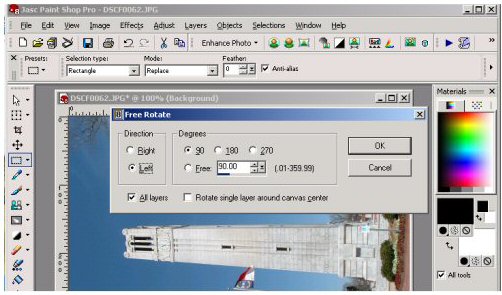
Rotating Using PaintShop Pro
|
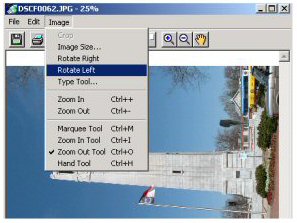
Rotating Using FinePix Viewer
|
Other matters that are often addressed as you move forward with using your digital camera include:
- What technique should I use -- How should I send the pictures (if I want to do so) to friends/family?
- How do I print the pictures?
- How do I put the images on the Web for others to share?
All good questions -- and topics for future and, in some cases, past newsletters.
Good luck and good digital camera / home computing!
This Month's Example of Scanned Material and/or Digital Photographs
|
|
In most of my newsletters, I show a few examples of using an HTM-type approach at sharing photographs or other material including scanned images with family/friends.
This month I discuss/show examples of:
- Try -again- to show on a computer display a comparison of a 2-meg-pixels digital camera image as compared with a 1-meg-pixels digital camera image.
- Pictures -to- a Paper Calendar
- This month's Great Golf Hole.
To see this month's example click anywhere on the following image, or, on the link below the image.

(I also have copied from images from the official Web sites (such as http://marsrovers.jpl.nasa.gov/home/index.html) and point to my examples in the above linked-to Web page. If you are interested in what I select over the next couple of months, OK. Make sure, however, you rely on the official Web sites for current, accurate, information and images!).
Link to This Month's Photograph Examples from SCScompA (if you did not click on the above image).
-----------------------------------------------------------------
Don't hesitate to contact scscompa@aol.com with any comments regarding the above or for any related discussion.
|
|
